
Denial-of-service attacks (DoS) have unfortunately become routine for public web services. There are far too many types and variants of these attacks to attempt any classification here. One thing is clear: full protection against distributed DoS (DDoS) requires a specialized cloud service. This article reviews what the built-in tools of the Angie web server can do against ordinary DoS attacks and simple DDoS attacks.
Video version
A video version of this article is available on YouTube.
Request rate limiting
Take the most naive and simple attack scenario: run a load-testing tool (ab, wrk, and so on) aimed at a dynamic document. With no protection in place, most applications eventually stop responding under the load of heavy requests. Such an attack does not even need special resources: one computer and an average internet connection will do.
The first line of defense against this kind of DoS attack is a limit on the request rate to the backend. The backend usually consumes most of the system's resources, has hard throughput limits (requests per second, RPS), and is therefore the attack target.
Rate limiting in Angie is handled by the standard Limit Req module. The limiter itself implements the Leaky Bucket algorithm. To limit requests you create a shared-memory zone (in the http context) and apply the limit with the limit_req directive in a location or a server block. For example:
http {
limit_req_zone $binary_remote_addr zone=lone:10m rate=5r/s;
    ...
    server {
    …
    location / {
        proxy_pass http://localhost:8080;
        limit_req zone=lone burst=5;
    }
    …
}
The zone settings (limit_req_zone) define the key requests are counted by, the zone size (10 MB), and the rate limit — 5 requests per second. This raises several questions at once: how do you choose the zone size, the key, and the request rate?
Zone size follows from 8,000 states per megabyte of zone (per the documentation). The key depends on the task at hand: here we track requests by client IP address. If the zone will serve several sites, the domain name can be added to the key (the $host variable, for example). The trouble with a client IP is that it cannot separate real users who share one address through NAT — the normal situation on IPv4. To solve that, session cookie values or some other identifier can be added to the key.
The rate is the harder choice. At a minimum, it helps to know the backend's throughput ceiling and set the limit there. After that, apply judgment when setting limits on individual locations. Serving whole documents usually needs 3–5 requests per second. High-frequency locations (AJAX requests, for example) need several times those values — in a separate zone, of course.
Now let's look at the request-limiting directive in detail:
limit_req zone=lone burst=5;
It sets the limit zone (one zone can back several limit_req directives). It also allows bursts of up to 5 requests above the rate set in the zone. Say 5 requests from one client arrive within a single millisecond — that is far above 5 RPS (one request per 200 ms), but we let them through. They reach the backend at the limited rate (one request per 200 ms). To pass bursts with no delay at all, add the nodelay attribute:
limit_req zone=lone burst=5 nodelay;
There is also a way to set the number of requests after which they start being delayed (the delay parameter):
limit_req zone=lone burst=5 delay=2;
Before enabling this in production, test the limit values and see how often they trigger under real load. The limit_req_dry_run directive handles that:
location / {
    proxy_pass http://localhost:8080;
    limit_req zone=lone burst=5;
    limit_req_dry_run on;
}
In this configuration the limits are counted but not enforced (requests are neither delayed nor dropped). At the same time, messages about exceeded limits are written to the server's error.log. A record of a delayed request:
2026/02/12 16:07:09 [warn] 4775#4775: *43 delaying request, excess: 9.970, by zone "lone", client: 192.168.122.1, server: _, request: "GET / HTTP/1.0", host: "192.168.122.141"
A record of a rate-limited request:
2026/02/12 16:08:14 [error] 4775#4775: *220 limiting requests, excess: 10.750 by zone "lone", client: 192.168.122.1, server: _, request: "GET / HTTP/1.0", host: "192.168.122.141"
The log levels for delaying and blocking requests are set by limit_req_log_level.
Rejected requests get response code 503 by default; change it with limit_req_status.
You can watch the request limits at work in Angie's built-in monitoring tool, Console Light (the HTTP zones tab):
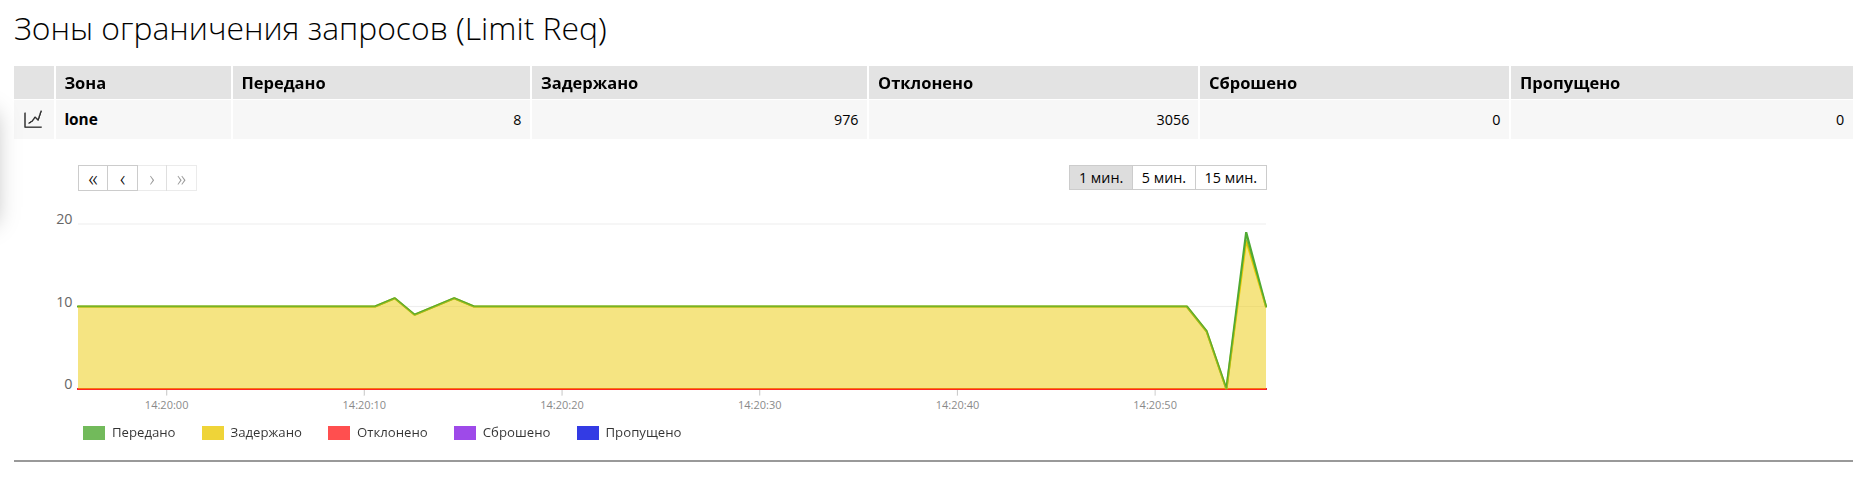
The Limit Req module blocks requests, but it has no permanent ban for repeated limit violations. Implementing such bans needs an external tool — the Fail2Ban package, for example (covered in a separate article).
Limiting active connections
Beyond the request-rate limit, Angie can cap the number of client connections (the standard Limit Conn module). Unlike the request-rate limit, though, connection limiting has a very narrow use.
The restriction applies to active connections only — connections that are processing a request right now. Also note that with HTTP/2 and HTTP/3, each active request (stream) counts as a connection. And remember about clients behind NAT when an IP address is used as the key: a single IP can hide an entire office. Incidentally, while the request limit only works in the HTTP module (requests exist only there), the limit on active connections can also be used in the Stream module (TCP, UDP).
To configure such limits, create a shared-memory zone to hold the state (in the http or stream context):
limit_conn_zone $binary_remote_addr zone=addr:10m;
The logic matches the request case: the zone key (binary IP), the name, and the size. To apply the limit, add the limit_conn directive to a server or location block:
server {
    …
limit_conn           addr 1;
limit_conn_log_level error;

    location / {
        proxy_pass http://localhost:8080;
    }
}
By default a limited connection gets a 503 response; change that with limit_conn_status. The log level for the limiting message in error_log is set by limit_conn_log_level. Connection-limit messages look like this:
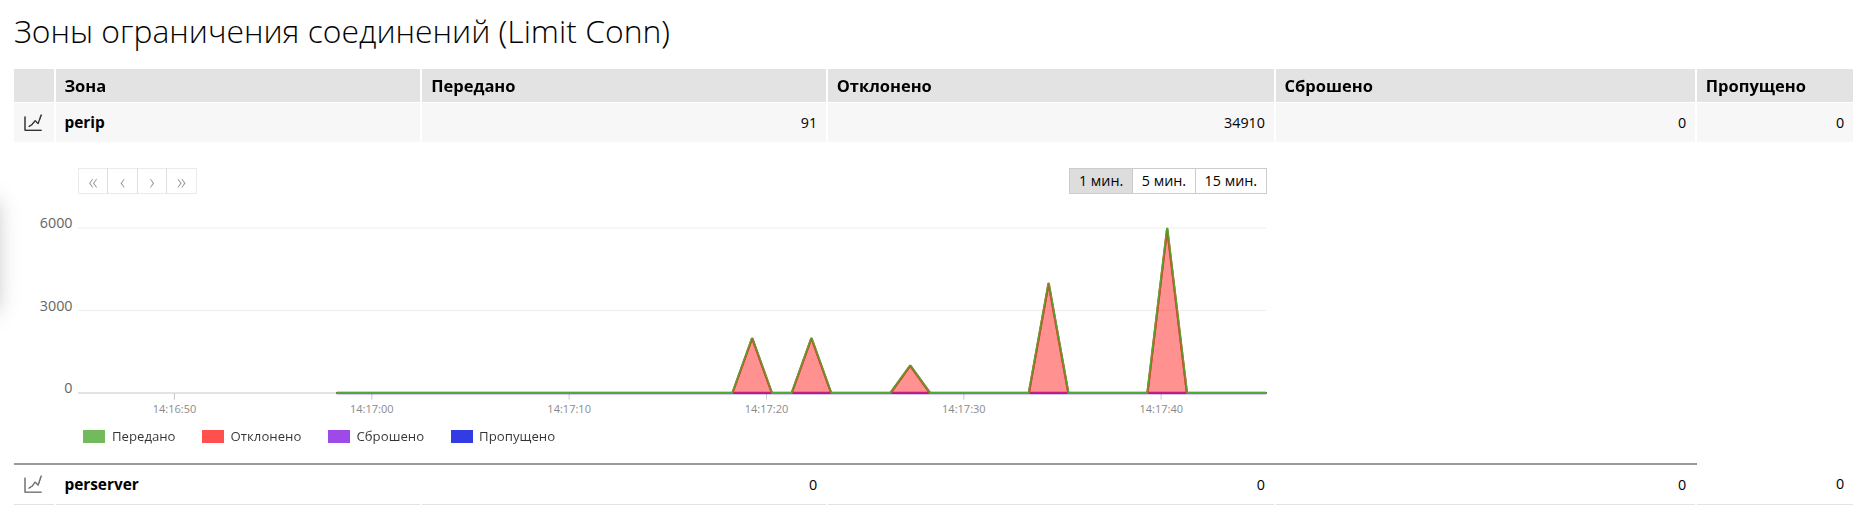
2026/02/13 14:13:08 [error] 3622#3622: *85 limiting connections by zone "perip", client: 192.168.122.1, server: _, request: "GET / HTTP/1.0", host: "192.168.122.141"
You can watch how connection limits work in Angie's built-in monitoring tool, Console Light (the HTTP zones tab):
Bandwidth limiting
Previous parts of this article focused mostly on protecting the backend from excess load, but there is one more way to exhaust a server's resources: saturate the outgoing channel (or interface) completely. The attacker only needs bandwidth greater than the server's, which is easy with several attacking hosts. Sometimes such an attack happens by accident — when a large static file is hosted on the server, for instance. By default clients download a resource at the maximum speed available to them, which can saturate the server's channel. That will probably not make the server fully unavailable, thanks to TCP's flow-control mechanisms, but it can drive up traffic consumption and slow down small resources.
In that case it can help to cap the bandwidth for individual clients. The standard limit_rate directive does this. Here is how it looks in a location (you can limit at the http, server, location, and if-in-location levels):
server {
    …
    location /video {
        limit_rate 5000k;
    }
}
The limit is measured in bytes per second and applies per active request. If a client opens several connections, the limits add up. The limit_rate directive accepts variables, which allows more elaborate limiting logic with map. For example, you can limit only selected clients by their User-Agent header:
http {
  map $http_user_agent $rate {
        default 0;
        ~*(bot|crawl|python|apachebench|curl) 500k;
  }
  server {
    …
    location /video {
        limit_rate $rate;
    }
  }
}
Here we limit the speed for only some client types, selected by a regular expression over the User-Agent header. You may, however, need to block certain client types outright.
Blocking based on User-Agent
Suppose you see a large number of requests from bots identified by their User-Agent. You can of course block them with /robots.txt, but that only works for well-behaved bots that follow the rules:
User-Agent: Testbot
Disallow: /
For bots that do not obey, you can block by matching the User-Agent against regular expressions. Example configuration:
http {
  map $http_user_agent $limit_bots {
    default 0;
    ~*(libwww|Python|perl|urllib|Curl|PycURL|Pyth|webcraw) 1;
  }

server {
    …
    if ($limit_bots = 1) {
        return 444;
    }
  }
}
Here we define the $limit_bots variable with a map over the User-Agent header. Then, at the server level, we add an if block to block bots. The example uses the return directive with the special code 444, which tells Angie to drop the connection instead of responding to the client.
When using this method, be careful with the regular expressions so you do not block legitimate bots (search engine crawlers, for example).
Summary
This article collected the standard tools for fighting simple DoS attacks. They will most likely be enough to repel an ordinary attack.