
Modern application infrastructure is dynamic and demands flexibility from the configuration of its key components. This article covers every way to implement dynamic server groups (upstream) in Angie. With these methods you can change the membership and status of servers without touching the Angie configuration.
Video version
For your convenience, a video version of this article is available on YouTube.
Addressing servers by name
The most accessible way to organize dynamic servers in groups is to use names (DNS) for the servers. By default, Angie resolves names to IP addresses when it starts or reloads the configuration, then uses those addresses to connect to the servers. Adding the resolve parameter to the server directive, however, makes Angie refresh server addresses during normal operation. For this to work you also need a shared-memory zone to store server state and a declared DNS server address (resolver). On the DNS side, create as many A records as needed for the domain name that will be used in the server directive.
The minimal configuration then looks like this.
http {
  resolver 127.0.0.53 ipv6=off valid=30s status_zone=local;
  upstream backend {
    zone upstream-backend 10m;
    server back.example.ru resolve;
  }
  server {
    listen 80 default_server;
    location / {
            proxy_pass http://backend;
    }
  }
}
In this example we used the local resolver systemd-resolved. IPv6 use is disabled, and the response lifetime is set to 30 seconds (this overrides the DNS server's response TTL). Keep in mind that the DNS server in this scenario must be sufficiently reliable: when it is unreachable, the proxied server list will not be updated. The server must also sit in a protected network under your control. The resolver directive can list several DNS servers; they are then polled in round-robin order.
In the example above we defined only a single server name, but a whole group of IP addresses can hide behind it, since DNS allows multiple A records for one domain name. That gets you a group of servers for load balancing, but you cannot conveniently manage fine-grained settings for each server (weight, backup status). For those tasks, use the more advanced SRV-type DNS records.
Using SRV records
We keep using DNS as the source for the proxied server list, but now we create SRV records, which can hold more properties than plain A records. Consider the following set of records (a fragment of the local.lan zone, bind configuration format):
localback       IN      A       127.0.0.1
_http._tcp.back IN      SRV 10 1 9001 localback.local.lan.
_http._tcp.back IN      SRV 10 2 9002 localback.local.lan.
_http._tcp.back IN      SRV 20 1 9003 localback.local.lan.
_http._tcp.back IN      SRV 20 2 9004 localback.local.lan.
The first A record provides the name localback.local.lan. The remaining records define the server list. In an SRV record we see three numeric parameters:
SRV 20 2 9004
The first number (20) is the record priority. In our case it affects server status: the minimum value corresponds to the primary (in-service) server, and all larger ones to backup servers. The second number (2) is used as the server weight, and the third (9004) is the port of the server to proxy to.
DNS record setup is complete; all that is left is to adjust the upstream block config to use them.
upstream backend {
    zone upstream-backend 10m;
    server back.local.lan resolve service=http;
}
When using the Angie Console Light monitoring console, you can view the current upstream list (the HTTP upstreams section).
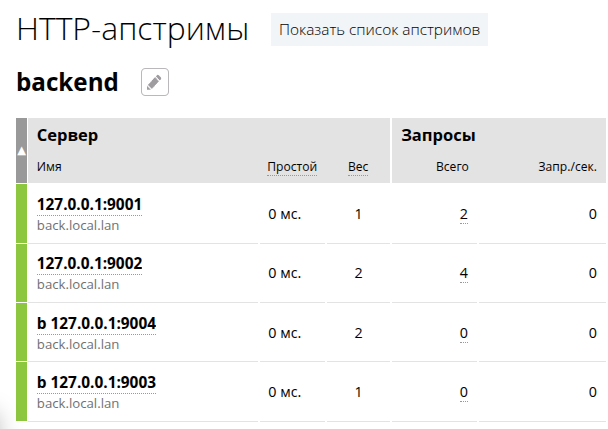
The screenshot shows the first two servers in service and the other two marked as backups (b); server weights are visible as well. In container environments, working with an API directly (the Docker API, for example) may be the most convenient way to build dynamic server groups.
Management via the Docker API
The Docker module implements work with the Docker API. It lets you talk to the Docker daemon through the API over a socket. Angie then uses special container labels to build the server list in upstream blocks.
The first thing the module needs is a connection to the daemon through the socket. The default socket address (file path) is /var/run/docker.sock.
http {
  docker_endpoint unix:/var/run/docker.sock;
  ...
}
The user Angie runs as must have read and write access to this socket. Usually this is solved by adding the user to the docker group; for Ubuntu and the www-data user, this command is enough:
usermod -aG docker www-data
When connecting to the Docker API on remote hosts, communication with the daemon happens over HTTP or HTTPS. In that case authentication using a client block may be required. Below is an example of basic HTTP authentication for remote Docker API access. The example also includes internal locations for finer tuning (@docker_events and @docker_containers).
http {
  docker_endpoint https://192.168.0.20:4242;
  client {
    proxy_set_header Host docker.example.com;
    proxy_set_header Authorization "Basic QWxhZGRpbjpvcGVuIHNlc2FtZQ==";
    location @docker_events {
    }
    location @docker_containers {
    }
  }
}
Note that basic HTTP authentication does not protect the transmitted login and password: the authentication string is the login and password separated by a colon and encoded in base64. So when using it, configure HTTPS.
echo `echo QWxhZGRpbjpvcGVuIHNlc2FtZQ== | base64 --decode`
Aladdin:open sesame
Now we create the usual configuration with a server and an upstream block, but with no server directive in that block.
upstream u {
    zone upstream-backend 10m;
}

server {
    listen 80 default_server;

    server_name _;

    location / {
        proxy_pass  http://u;
    }
}
Next, prepare the containers for the servers. It is most convenient to start them with docker compose, putting all the labels in the docker-compose.yml file. Below is an example of such a file for two containers.
services:
  debug-white:
    image: vscoder/webdebugger
    labels:
      - "angie.http.upstreams.u.port=8080"
      - "angie.network=docker_back_labels_app-network"
      - "angie.http.upstreams.u.weight=2"
      - "angie.http.upstreams.u.max_fails=3"
    container_name: debug-white
    restart: unless-stopped
    environment:
      APP_DELAY: 0
      APP_PORT: 8080
      APP_BGCOLOR: white
    networks:
      - app-network
    ports:
      - "9000:8080"
  debug-blue:
    image: vscoder/webdebugger
    labels:
      - "angie.http.upstreams.u.port=8080"
      - "angie.network=docker_back_labels_app-network"
      - "angie.http.upstreams.u.weight=1"
      - "angie.http.upstreams.u.max_fails=3"
    container_name: debug-blue
    restart: unless-stopped
    environment:
      APP_DELAY: 0
      APP_PORT: 8080
      APP_BGCOLOR: skyblue
    networks:
      - app-network
    ports:
      - "9001:8080"
networks:
  app-network:
    driver: bridge
The key points of the container configuration are using labels to pass data to Angie and the named network the containers are connected to. Then start the containers and check that they work.
docker compose up -d
With this configuration you can see the list of upstreams and their main properties.
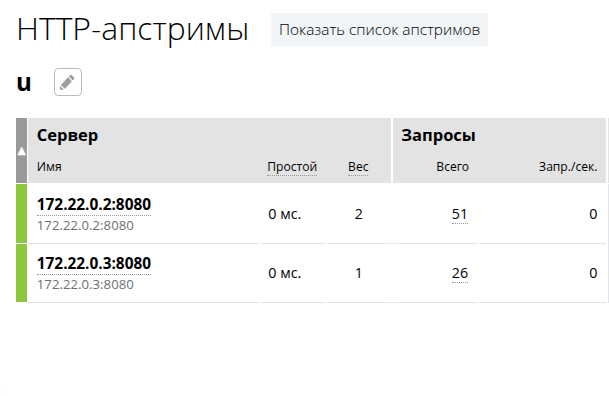
Let's look at the Docker label values individually:
angie.http.upstreams.u.port=8080— the container's internal port for proxying;angie.network=docker_back_labels_app-network— the name of the container's Docker network (the directory name is added as a prefix, so the full network name must be given);angie.http.upstreams.u.weight=1— theweightparameter for theserverdirective;angie.http.upstreams.u.max_fails=3— themax_failsparameter for theserverdirective.
See the documentation of the Docker module for the full list of available labels.
Everything described in this article applies to both L7 HTTP(S) and L4 (TCP/UDP) proxying.
Summary
We looked at three ways to organize dynamic server groups, starting from simple DNS usage and ending with working with the Docker API. Such approaches significantly increase the flexibility of managing the application infrastructure and the ease of maintenance.