
Server-side caching is one of the most effective ways to reduce load in web applications. Angie provides a wide range of configuration options that cover many cache usage scenarios.
Video version
A video version of this article is available on YouTube.
How the cache works in Angie
A clarification up front: this article covers server-side caching of backend responses with the http_proxy module. Similar settings exist in the other proxying modules (fastcgi, scgi, uwsgi). The main goal of this caching is to store a backend response and reuse it when a client requests the same resource again. The cache in Angie lives on disk, and each entry is a file. The file path and name are determined by the cache zone and cache key settings.
The obvious question is why not put the cache in RAM? Accessing in-memory cache entries is indeed faster, but there are two arguments against storing the cache in RAM. First, frequently used files are already cached by most operating systems when free memory is available, so access to them is just as fast. Second, a disk cache lets the server start quickly without a long warm-up phase. And of course, there is far more space on disk, so the cache can be much larger.
Each cache entry has a validity period and a time to live on disk. Initial loading and removal of files are handled by two dedicated processes: cache loader and cache_manager, respectively.
The first thing to configure for server-side caching is the cache zone.
Configuring the cache zone
Cache storage in Angie is split into zones. Each zone is a directory in the filesystem, defined with the proxy_cache_path directive. Take a look at an example cache zone configuration:
http {
proxy_cache_path /var/www/cache levels=1:2 keys_zone=one:10m:file=/etc/angie/cache.state inactive=4h max_size=800m;
}
The first parameter is the storage path for cache files (/var/www/cache). Next comes the number of nesting levels used to split files across directories; up to three levels are allowed. Each level takes 1 or 2 — the number of digits in the directory name. With the settings above, a cache file named 582f017bcde4b1e41623812ee6d93350 will be stored in the directory /var/www/cache/0/35.
The keys_zone parameter sets the zone name (one), the size of the shared memory area used to store keys (10m), and a file (cache.state) that keeps key state across a process reload so it can be restored in memory afterwards. Storing cache state in a file was added in Angie 1.9.0.
The next parameter (inactive) sets how long cache files are kept if they have not been accessed (4 hours). Finally, the maximum cache size on disk (max_size) is set (800 MB). You can also set the minimum amount of free space on the filesystem hosting the cache (min_free).
For finer tuning of the cache loading and cleanup processes under disk load, use the manager/loader_files, manager/loader_threshold, and manager/loader_sleep directives.
With the cache zone configured, move on to the cache key.
Configuring the cache key
The most important part of the setup is the cache key. It is a set of variables that serve as arguments to the hash function that determines the cache file name. One reasonable option looks like this:
proxy_cache_key $scheme$host$uri;
This setting identifies a response by its full address (scheme, host, URI without parameters). If the response content depends on other request parameters (headers, cookie values, and so on), add them to the key. For example, add the value of a cookie named ID:
proxy_cache_key $scheme$host$uri$cookie_ID;
An MD5 hash of the key value determines the file name and its placement within the cache zone. The cache is now ready to be enabled — that is, turned on in a proxied location.
Enabling the cache in a location
The cache naturally belongs in the location that proxies to the backend. The main directive that turns the cache on is proxy_cache. In practice, though, you usually want finer control over cache behavior, and a typical configuration looks roughly like this:
server {
  location / {
    proxy_cache one;
    proxy_cache_valid 200 10s;
    proxy_cache_lock on;
    proxy_cache_background_update on;
    proxy_cache_use_stale updating;
    proxy_pass  http://backend;
  }
}
The first directive (proxy_cache) enables caching with the zone one. Next, at the location level, set the validity time (proxy_cache_valid) of a cached response; here, responses with code 200 are cached for 10 seconds. Multiple proxy_cache_valid directives can be given for different response codes. Response buffering (proxy_buffering) must also be enabled for caching to work; it is on by default.
The cache lifetime depends on the content. Content that changes rarely suits a long validity time, while dynamic content suits the shortest one. For example, at a load of 100 RPS, one second of caching cuts backend load by roughly a factor of 100.
For performance, write locking is enabled (proxy_cache_lock), so only one request goes to the backend to refresh a cache entry even when several clients request the same resource in parallel. Background cache updates are also enabled (proxy_cache_background_update): the client quickly gets a stale response while the cache is refreshed in the background. For background updates to work, the following directive is required (proxy_cache_use_stale), which allows serving a stale response from the cache.
That completes the cache configuration, but a few more points deserve attention. Start with bypassing the cache and forbidding caching of certain responses.
Bypassing and forbidding the cache
A common task is getting a guaranteed fresh response past the cache. That is what the proxy_cache_bypass directive is for. For example:
proxy_cache_bypass $cookie_forceupdate $arg_forceupdate;
With this setting, it is enough to set a cookie named forceupdate with a non-empty value, or to add a GET parameter forceupdate to the request. For example: http://test/test?forceupdate=1.
Angie also uses response headers to decide whether to cache. A backend can set the Cache-Control, Expires, and X-Accel-Expires headers and control caching through them. Responses with a Set-Cookie header and Vary: * are also not cached. This header processing can be turned off with proxy_ignore_headers:
proxy_ignore_headers "X-Accel-Expires" "Expires" "Cache-Control";
With this configuration, responses are cached even when headers forbid storing them. In other words, clients can receive stale responses even if the application explicitly disallows caching.
To forbid caching of certain responses entirely, use the proxy_no_cache directive, which is configured in the same way as proxy_cache_bypass:
proxy_no_cache $cookie_nocache $arg_nocache$arg_comment;
The configuration above forbids caching responses when a cookie named nocache is present, or when the parameters nocache or comment are present.
The cache can also be restricted by HTTP request method. GET and HEAD requests are cached by default, but the list can be extended or reduced. For example:
proxy_cache_methods GET HEAD POST;
So there is a wide set of tools for fine-tuning what gets cached. Angie can also serve from the cache when the backend fails; let's look at that case in more detail.
Handling backend errors
Suppose the backend (or the whole server group) is unavailable at the time of a request (no connection, 5xx errors, and so on), but the cache already holds a response — even if a stale one. In most cases, serving the old response while backends come up is better than returning an error to the user. This behavior is configured with the proxy_cache_use_stale directive, for example with these parameters:
proxy_cache_use_stale updating error timeout invalid_header http_500 http_502 http_504;
This gives fairly broad permission to serve a stale response from the cache: during cache updates, on a server selection error, on server timeouts, on response errors, and on response codes 500, 502, and 504.
Keep this mechanism in mind when monitoring the application through requests to Angie, because a backend outage can be masked by cached responses.
Caching large responses
For large responses (video, archives), the Slice module is useful; it splits a response into ranges. With the normal algorithm, a response is only written to the cache after Angie has received it in full, and the whole response then occupies a single file on disk. The result is high latency when writing the cache to disk and when reading it.
The solution is to split the response (slice), so caching works on response parts and the cache can be applied more flexibly and efficiently.
A cache configuration with splitting is shown below.
location /video {
    slice             10m;
    proxy_cache       cache_slice;
    proxy_cache_key   $host$uri$slice_range;
    proxy_set_header  Range $slice_range;
    proxy_cache_valid 200 206 1h;
    proxy_pass        http://backend;
}
This example splits responses into 10 MB parts (slice 10m). For correct operation, the $slice_range variable is added to the cache key, along with the Range header. Caching of responses with code 206 (Partial Content) must also be added (proxy_cache_valid). Cache splitting is now configured.
Targeted cache purging
The standard caching mechanism does not support targeted purging of cache entries with Angie's own tools. The task can be solved with the third-party Cache Purge module. Install it and load it in the main section of angie.conf:
apt install angie-module-cache-purge
load_module modules/ngx_http_cache_purge_module.so;
Cache resets can now be triggered by a special request. The simplest configuration using a single location looks like this:
server {
  location / {
    proxy_cache one;
    proxy_pass  http://backend;
    proxy_cache_purge PURGE from 127.0.0.1;
  }
}
Here the cache can be reset only by a request from localhost. Send the request with this command:
curl -X PURGE http://127.1/*
The request above uses the PURGE method to reset the cache and clears it by the URI mask /* (a partial key); the asterisk can only be placed at the end. The purge request's key value must match the cache key. The response shows whether the purge succeeded and which key values were cleared. For wildcard purging to work correctly, the last parameter of the cache key must be the $uri variable.
Another option is a separate location for purging: purge requests go to a dedicated address, and the composition of the key used to find the entries to delete is set in the proxy_cache_purge directive. The example below shows this.
http {
  map $uri $wpurgeuri {
    "~/purge(?<wpurge>/.*)" $wpurge;
    default $uri;
  }
  server {
    location / {
      proxy_cache one;
      proxy_pass    http://backend;
      proxy_cache_purge PURGE from 127.0.0.1;
    }

    location /purge {
      allow 127.0.0.1;
      deny all;
      proxy_cache_purge one $wpurgeuri$is_args$args;
    }
  }
}
This creates a dedicated variable $wpurgeuri that serves as the purge key. It is built from $uri, but without the /purge prefix.
With this configuration, a cache purge request must include the /purge prefix. For example:
curl -X PURGE http://127.1/purge/*
This gives you partial cache purging.
Logging and monitoring
Cache statistics are available through the API or Angie Console Light. Angie also ships with a Prometheus exporter for visualization in Grafana. Available metrics include the cache hit rate, cache status, size of files on disk, traffic statistics, and shared memory zone usage.
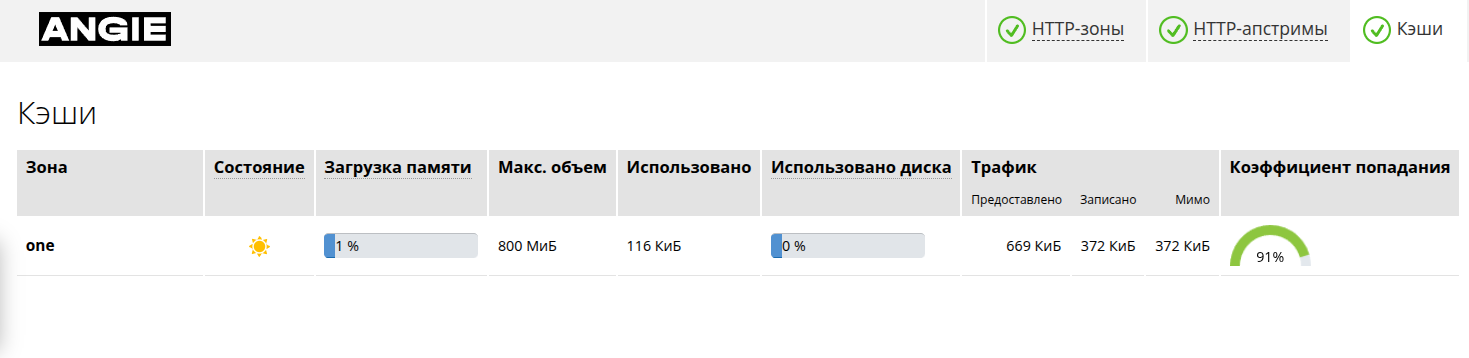
It is useful to record the cache status in logs. The $upstream_cache_status variable provides it.
Summary
You should now have a general picture of what server-side caching in Angie can do. Used properly, the cache can dramatically cut application response time and relieve load on backend servers. This article covered most of the configuration aspects and solved typical tasks. It also covered targeted cache purging with a third-party module and cache monitoring.